Last week I introduced the Design Cubicle’s new logo and this week I would like to share my creative process with all of you. Before I begin, it’s important to have an understanding how the name ‘Design Cubicle’ name to be: Around my 2nd year of high school I began to take graphic design more serious and consider it as my career path. I continued working at it, improving my skills and continued my education at Temple University. Taking my very first ‘introduction to design’ class, I remember there was no better feeling than sitting behind the computers with my headphones on… designing, creating, thinking — in my own little world. My career path led me to various design studios directly out of college and found myself sitting behind cubicles with my headphones on, once again designing — freeing myself from everything else. While most dislike the dreaded cubicle, I oddly enough found myself enjoying it. For me, it served as my own world. A place to create, interact with other designers, learn and forget about everything else in my life — my own design community. Now working mostly from home as an independent graphic designer, I wanted my blog to reflect the same sense of community that the workspace and “cubicle-life” provided me — A place to create, interact and learn — The Design Cubicle.
Phase 1: Defining the goal
The goal was to create a logo that was memorable, represented the cubicle concept and showed a sense of community and connectedness, as discussed above. I also wanted it to be simple and smart, since I am a firm believer that less is more. It also had to work well in various sizes, since it was to be used as the site’s favicon and other smaller online propaganda.
Phase 2: Sketching and visual brainstorming
Sketching is an extremely important step of any design process. It helps to get your ideas down quickly and without attention to unnecessary detail in the beginning. Below, you can see where the final logo was starting to take form in the sketches circled in red.

Phase 3: Bringing the above ideas to the computer
Once I had some groundwork to pull from, I opened up Illustrator and did some “computer sketching”, playing around with various combinations and more ideas. Notice below that some of the ideas steered away from the initial goal, but sometimes turning another direction gets you back on the correct path — Guess that’s why it’s called a creative “process.”

Phase 4: Narrowing it down
Most of the time I find myself going back to repeat phases 2 and 3 before narrowing my ideas down to two or three choices. This phase is usually the point where I start playing around with variations and typefaces of the ideas from phase 3. This stage was particularly hard for me for this specific logo because I like both the right and left side variations.
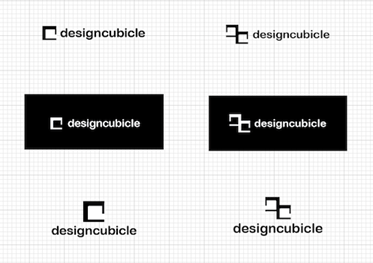
Phase 5: Making the decision
While the final decision was tough, I decided to go with the “double cubicle”. I felt it had more of a suggestion of cubicles and ‘DC’. It connected back to the goal of portraying a sense of community and connectedness with two cubicles that were intertwined. What do you think?
Which variation in Phase 4 do you prefer?
Feedback is always appreciated and serves as a valuable step in the creative process. Feel free to add a comment or share your thoughts.